Hand-pieced Sampler

Hand-pieced Sampler
Showing posts with label Designing a quilt. Show all posts

Saturday, February 21, 2015

The top for the butterfly quilt is finished!  I added legs and feelers to the butterfly and a stem for the flower bud this evening.


I used a stem stitch with two strands of floss for the butterfly appendages, the same gray as the markings.


 I used one strand of gray and one strand of green in the needle for the grass.  The little star flowers were three strands of white with an iridescent purple bead in the middle of each one.


Now it's time to quilt!  I'll be making parallel diagonal lines, all running from the upper right to the lower left to suggest rain.  At the moment, I'm thinking of making them 1 inch apart, but I may go closer.  I'll add iridescent navy blue beads to the rain lines and have some clear "raindrops hanging from the butterfly and possibly the flowers and leaves.

I really do think I'll get this finished for the April challenge.

Friday, February 13, 2015

I'm glad to be back to work on my butterfly quilt.  I have the butterfly on and embroidered, this time with gray thread, and I've started the grassy base.
For the grassy base, I've made five thick blades of grass from my gray/green/lavender batik.  I'm pretty pleased with the points on those narrow pieces.  I'm going to add at least twenty skinny blades of grass with embroidery.  I'm using one strand of green and one strand of gray in the needle.  I'll scatter tiny white embroidered flowers with a lavender bead center through the grass.  I think it will be close to my vision!
I also took a crazy quilt workshop at my guild on Sunday.  I went to the thrift shop downtown and bought a velvet scarf and a velvet children's dress.  I used the scarf in this block, but I couldn't quite make myself cut into the sweet little dress, which still has the tags on it.  Velvet is a son-of-a-gun to work with - especially when you're sewing it to silk.  Next time, I'll hand stitch those kinds of seams.  Our teacher, one of our guild members who did an excellent job, told us to take a photo of the unadorned block for reference.  Here's mine:
The center is brown velvet, and the upper right hand corner is the velvet lining of the scarf.  Most of the other pieces are silk.  I don't much like the look of it now.  I was trying to be brave with color.  I'm hoping that it will improve with piles of embellishment.   I have no idea what I'll do with this block, whether it will be a stand-alone or the first block in a big quilt.


Saturday, January 24, 2015

Diane commented on my last post that I could make index-card windows to audition different spots on my fabric for the three butterfly parts,  I followed her advice and chose a darker gray background for the back wing and body and a lighter shade with lots of spots for the front wing.
Today I finished appliqueing the bud and flower and pressed the fabric pieces around the freezer paper for the butterfly.  I laid the butterfly on the background to see how it looks so far.  I haven't attached the butterfly or done any embroidery yet, but I think it's going to be much better in this fabric.  (I still struggle to photograph the colors in their correct values.)

The bud will be connected to the stem with a slim embroidered stem.  I'm thinking of mixing green and lavender threads in that little stem and using two shades of gray thread for the lines on the butterfly.


Friday, January 23, 2015

I haven't posted in a while, not because I haven't been sewing but because I've been working on a secret project for a friend.  When it is delivered, I'll post about it here.

Finally, I'm back to working on the butterfly-in-the-rain challenge quilt!  I've been fairly happy with the appliqued stem and leaves, but it's so hard to get points on those skinny leaves.  After the very close work on stitching those, I took a step back and looked at the whole picture.  The stem, leaves, and flowers looked lovely until I threw on the yellow butterfly.  Yuck!
The other colors and designs were so subtle, that the butterfly looked like a cartoon character.  Even the one drawn on graph paper with a pencil looked better.  Although the yellow was the palest shade I had, it ruined the rainy effect I had created with the mottled stems and leaves and grayish lavender flower.
My friend Andrea and I had planned a field trip to Olde City Quilts in Burlington, NJ, today, so I took this block along, and she (and the friendly staff at the shop) helped me pick out this fabric.  I never would have chosen it, or even looked at it, myself.  I was thinking of plain white or gray.  The white would have been too stark and not improved the situation.  And, really, who wants a gray butterfly?  This is a batik with a white and gray background and scattered dots of turquoise and lavender.  I bought a quarter yard to give me lots of background shades and dots to choose from. 

Here's a close-up.  The color is somewhere between these two photos.
I think that I'll divide the butterfly pattern into three parts: the two wings and whatever that other piece is that hangs down.  The body?  I also think I'll switch to a more subtle embroidery thread than black.  Maybe charcoal gray. 

It feels a little crazy to do the whole butterfly again, but I have a lot more time to put into this, especially the quilting with beads, so I want to like it when it's finished.  Snow is predicted for tomorrow, so I'm hoping for lots of time to remake the butterfly.


Monday, January 5, 2015

I'm happy finally to be ready to put some of this picture on the background.  I wasn't pleased with my big lumpy flower.
I decided to make four petals instead.  I think this will look better.
I really liked the exact curve of the stem, so I had to figure out how to transfer it from the sketch to the fabric.  I decided that I could cut out the stem and then use my Bohn ceramic chalk pencil inside of the hole I cut to make the inside line of the curve.
Hey, ho!  Here we go!


Saturday, January 3, 2015

I made some progress on the weather challenge quilt today.  While I love hand applique, I can't say that prepping the pieces is my favorite part of the job.  Today I prepped the leaves and the sepals.  OK, I confess that I had to look up the name of those green, leaflike things at the base of a flower.  Sepals - nice.

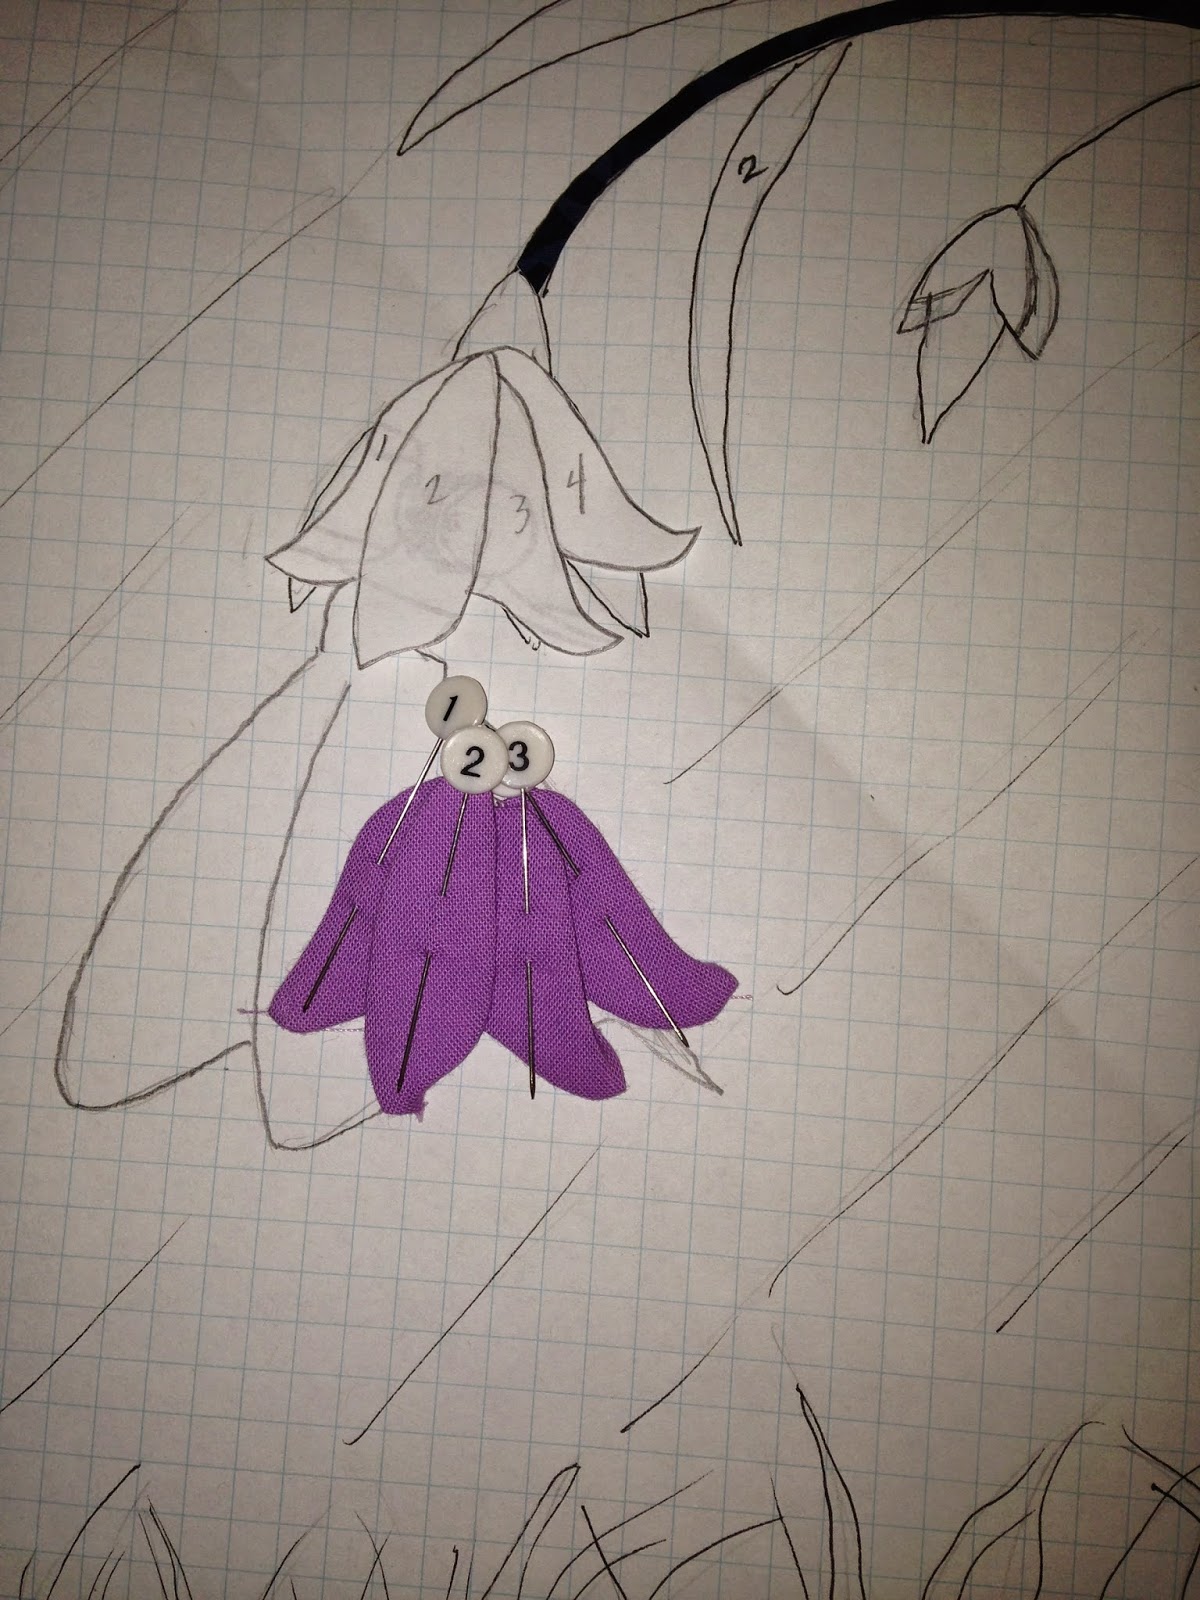
I pulled out all of my green fabrics and finally went with a fabric that is barely green - more blue-gray with a little violet in it.  I think it will make the leaves and stem look the way they might on a rainy day.  So far, they look like green beans.  I'm really worried about getting the points on the ends of these ever-so-slender leaves.
I was pleased to use my Christmas gift from my friend Andrea: the numbered pins.  I admired them at a guild retreat, and she remembered and got them for me.  Isn't she swell?  The pins match the numbers on my sketch.
I don't want to tell you how long I wrestled with the bud.  I'm still not sure that I'm satisfied with the sepals.  The fabric wanted to ravel at that inside point, and I think I sacrificed the outside points to fight it into place.  I may make a new one tomorrow.  (My camera seems to want to make this distinctly lavender fabric look pink.)
I cut out the large flower as one piece, but I think it looks like a big lump.  Tomorrow I'll make four separate petals and build the flower that way.  (Look at that!  The flower is the same fabric as the bud, and it looks lavender.  Makes no sense!)

I always reply to people who tell me that they wouldn't have the patience to make a quilt that it doesn't require patience if you love it.  Well, I still love it, but I have to admit that it's requiring some patience today.

Thursday, January 1, 2015

I suppose that I am one of about half a million bloggers who have made a resolution to return to blogging in 2015.  Maybe I'll be the one to keep it up.

I think I'll jump right in with what I'm working on now.  My guild's yearly challenge in coming up in April.  I'm quite sure that no one in the guild pays any attention to my blog, so I think I can post photos here.  The theme this time is "Weather."  I've decided to make a wall hanging based on the title of an old children's book, "Where Does the Butterfly Go When It Rains?"

Here is a sketch I drew on graph paper from a photo I found online.
I was most worried about creating the butterfly, because if I couldn't pull that off, the whole thing would be a bust.  I've worked for two days on it.  I decided to hand applique the blue lines and embroider the rest in black on a soft yellow cotton.  I'll cut out about 1/4 inch around it all and hand applique it to the background.
I'm using a lovely navy batik for the background, green for the grass and leaves, and a soft lavender (which, unfortunately looks pink in the photo) for the flower and bud.  I'll scatter some small white flowers in the grass.
The diagonal lines in the sketch will be hand quilted lines of rain.  I bought some tiny navy/iridescent beads to put into about every fifth stitch of quilting to make raindrops and some clear/iridescent beads for the edges of the butterfly's wings and to sew scattered in the grass.

I'm not worried about the stems, leaves, and flowers, but I really don't have a good plan yet for the grassy area.  I'm thinking maybe a mix of applique and embroidery again.  I love a good, scary project.

Monday, August 25, 2014

I had a chance to visit  the Morris Museum in NJ and was wandering around their extensive collection of vintage music boxes and automatons when I discovered these two musical sewing boxes. You can see the gorgeous sewing tools in the open one, but the information on the closed one said that it contained scissors, a thimble, a needle, and an EAR SPOON for collecting earwax to rub on the thread to make it go through the eye of the needle easier! (There was also a quilt exhibit, but, honestly, this trumped that in my mind.)
I love the beautiful golden tools.  Wonder what the bottle is for.  Medicinal spirits??
 
I so wanted to be able to open this to see the earwax spoon!

The Christmas house mini is finally finished.  I think it's cheerful and hope that lots of people try to win it in the upcoming raffle at our guild quilt show.  Since I just finished it, I am very aware of its imperfections.  Looking at the photo, I see that it isn't square.  How can that be??  I squared it just before I added the binding, and carefully stitched the binding on with a quarter inch seam.  I think I'll have to fool with it a bit more.  Darn!

Friday, August 1, 2014

Last weekend I went to Quilt Odyssey in Hershey, PA.  I couldn't believe the number of hand-quilted pieces in the show!  It's a small show, very juried, so each quilt is quite wonderful.  I spent an afternoon looking at the quilts and then went back for a few hours two days later to see them all again.

This mini (12"x12") won a blue ribbon.  Even standing in front of it, I couldn't get my head around the size of the work.  I left a little piece of the sign in the picture to give some size perspective.
My favorite quilt there was this gorgeous flower medallion - all hand appliqued and hand quilted.  There was some dimensional work on it, and I especially loved the lily of the valley.  I know that I will use this technique someday.


I took two classes: one called Happy Villages with Karen Eckmeier.  It was very freeing.  She is a clear teacher who also allows tremendous freedom.  Here are all of the things that I NEVER do that I'm doing in this quilt - not planning ahead, gluing, adding whimsical touches, using tulle, having raw edges.  Fun!  You can see that it is just halfway finished, but it will have to sit on the pile for a while, since I have work to do for the show in October.
The other class was in longarm quilting.  It was way over my head.  There were few students, and they were all quite experienced.  For a while, I tried to fake it, but then I decided to see what I could learn on my actual level.  It was a class on filling small spaces, and the two simple techniques I improved were echoing and making the same design to the right and left.  It turned out to be very useful.

Can you believe that I agreed to teach a little workshop at a local library in November?  It will be a two-hour Saturday program as part of their Homemade Holiday Gifts series.  I'm working on some samples that can be made by beginners, by hand, in two hours.  Don't know if this is possible.  I'll post my samples next time.

Thursday, July 3, 2014

I've been away, cruising on the Danube River.  What a beautiful trip!  It's funny how I see everything through a quiltmaker's eye now.  I kept snapping pictures of patterns for applique or quilting.  I'm not much of a photographer, but these are really just for reference.
This one was a plaster ceiling in the abbey at Melk, Austria.  Another one below.
The next one is the tile roof on the Matthias Cathedral in Budapest.
And here is a doorway in the Parliament building in Budapest.
And these two small bags were irresistible.  They are Hungarian and hand-beaded.  I can see them translated into applique.  They are stunning on black, but I'm not sure I want a black background.  I'm starting to imagine a medallion quilt with a pale yellow background and some of the flower designs in reds and pinks.  Not at all sure about that, though.
When I travel, I take along a project that will probably last me for years.  I make small Sawtooth Stars, cut from templates and pieced by hand from my scraps.  (I thought that these were called Evening Stars, but maybe not.  I think that they are also called Variable Stars.)  I try to make each one pretty within itself, but I don't try to make them match each other in any way.
Meet Dewey.  Look at that arrogant face!  "You want to take a photo of a star?  Well, here I am."


Thursday, May 29, 2014

I went on a quilt retreat with my guild.  It was so much fun!  There were thirteen of us in a lovely setting, with a cook who happily made me gluten-free meals, a massage therapist one day, and lots of sewing going on.

I started on my Christmas house quilt.  It was scary, because I had a picture, but I didn't know how to make it happen.  I got such good advice, especially from a woman who is working on a glorious crazy quilt.  I knew that I couldn't make that little cat out of fabric, or at least not in the way I usually applique, by hand with turned under edges.  The suggestion to embroider the cat with a satin stitch was perfect.  I admit here to using a very fine black marker to improve the outline of the cat.

Since the embroidery went so well, I got more advice about doing the wreath.  I used a feather stitch in two shades of green for the pine and little red berries of French knots.  I'm very happy with the results.  I did just a straight, black, machine stitch to define the windowpanes.  The next step is to hand applique the door and windows to the body of the house.

I also had a chance to finish the top of a T-shirt quilt that I've been putting off for a year or so.  It's for my public library.  The T-shirts were the prizes for six years of the children's summer reading program.  The thin sashing and borders are from a confetti print I bought at Hobby Lobby.  I'm hoping that the fabric stands up.  It feels fine, maybe a little stretchy.

I'm not sure yet how I will quilt it.  I'm thinking about a bubble-style meander in colors matching the t-shirts on the shirts themselves and something simple in black on the black sashing and the confetti-print sashing.

Once I give it to the library, it will be up to them what they do with it.  They may decide to display it in the storytime room, give it as a prize, or raffle it off. 

Thursday, May 15, 2014

We took a weekend trip to Boston for my daughter's birthday, and I had a chance to spend a day at the quilt exhibit at the Boston Museum of Fine Arts.  The quilts were all from the Roy/Pilgrim collection.  The theme of the exhibit was color theory, especially how backgrounds need not be white.  One room of the exhibit featured unusual quilts, and this one was certainly unusual.


It is an Amish quilt that includes some printed fabrics, and I love its story.  The woman who made it worked in a dry goods store, and the owner would give her fabric from the ends of bolts.  When she had gathered a pile of printed fabric, she went to the bishop and told him that she would either have to waste the fabric or break the rule that only plain fabric could be used in a quilt.  He told her not to waste the fabric, to go ahead and use it.  However, when the quilt was completed, she was so verklempt about the broken rule that she could never make herself use it on a bed! 

While in Boston, I worked on a sketch for my own Christmas House quilt. 


I'm not sure how I'm going to make it.  I'm thinking of using raw edge machine applique for the snow and then machine piecing the house and hand appliquing that onto the background.  I may have to starch the dickens out of the house to do that, or I may decide to foundation piece the house onto a piece of muslin before I applique it on. 

I'm not naturally very whimsical, so I'm still not sure about the rabbit out near the tree.  Somehow the cat in the window seems right, though.  Actually, the whole tree thing may change.  Possibly the big tree on the left will move down and I'll add a small one to the right of the house.  I may use beads to put lights on the outdoor trees. 

Thanks for stopping by.  All suggestions are welcome.

Tuesday, May 6, 2014

What to work on next???  Since I am the only member of my immediate family not to have or be working toward an actual PhD, I am glad to say that I have many quilting PHDs (Practically Hardly Done, for newbies).

With our guild show coming up in October, I need to make a mini-quilt for a raffle.  It can be anywhere from 6 by 6 inches to 24 by 24 inches.  I have it in my head that I should make a Christmas house scene.  I think that will be a popular theme in October.

I've been gathering fabrics.  I want it to be at night with a warm light shining out through the windows.  I've been thinking about this for weeks, and I think I'm going to have to combine foundation piecing with applique and a bit of hand embroidery. 


I found this dark, snowy sky piece several months ago.
I didn't think that I could use the dark sky for my foundation with the white snow on top of it, but I think the dark underneath really makes the snowflakes appear on the white.
Here is a very rough layout.  I'm thinking red door, yellow windows, green plaid drapes in the windows.  Hmmm, I'll have to be sure that the bricks are horizontal.  Vertical bricks won't make a very strong house, eh?
Time to get out the graph paper and draft it.  Any and all suggestions are most welcome.


Wednesday, April 30, 2014

The finished quilt actually came out the way I imagined it when I drafted it on graph paper.  That's a first!

AND, I won my first ribbon ever!  And it's blue!  Some of the other quilts were amazing, and I was surprised to win.  I think that the guild was surprised, too, since I'm pretty new there.  I wish I could post photos of the other quilts, but I can't do that without permission.

A friend - yes, she is a true friend - told me that some of the other quilts were more beautiful but than mine used the fabric in a unique way, which is probably why I won.  See, I said that she was true...and also truthful.