Hand-pieced Sampler

Hand-pieced Sampler

Wednesday, September 17, 2014

I've been traveling a bit - to a wonderful quilt retreat with online friends and to a family event in Vermont, so the sewing I've been doing is mostly adding hanging sleeves and labels to the quilts I'm putting into our guild show.

I did take advantage of the trip to Vermont to go to the Shelburne Museum.  There were two quilt exhibits.  I spent a lot of time in the textile building with about 30 of the quilts from their permanent collection of about 800.  I loved the variety and was impressed by the strong documentation. 
This was the featured quilt.  It is a beauty, but I noticed that the border on the right is clearly farther from the quilt top than the right border.  If you look at the stems of the roses, you can see that they are carefully curved to form a symmetrical pattern - that falls apart with the top left rose!  Two pretty obvious mistakes, and yet this quilt stopped traffic as people walked through the textile display.  It's a good lesson.

I thought this was an interesting use of silk neckties.  I'm not usually a fan of necktie quilts, but this one is quite elegant.

The second exhibit was all star quilts - mostly Bethlehem stars - just donated as a group.
I was shocked that only two of the almost forty quilts were attributed to the maker.  All others were by "unknown."  For Pete's sake, label your quilts!

This one, by an unknown Odawa Indian woman was just amazing.  The applique was made to look like the porcupine quill work of her tribe.

Monday, August 25, 2014

I had a chance to visit  the Morris Museum in NJ and was wandering around their extensive collection of vintage music boxes and automatons when I discovered these two musical sewing boxes. You can see the gorgeous sewing tools in the open one, but the information on the closed one said that it contained scissors, a thimble, a needle, and an EAR SPOON for collecting earwax to rub on the thread to make it go through the eye of the needle easier! (There was also a quilt exhibit, but, honestly, this trumped that in my mind.)
I love the beautiful golden tools.  Wonder what the bottle is for.  Medicinal spirits??
 
I so wanted to be able to open this to see the earwax spoon!

The Christmas house mini is finally finished.  I think it's cheerful and hope that lots of people try to win it in the upcoming raffle at our guild quilt show.  Since I just finished it, I am very aware of its imperfections.  Looking at the photo, I see that it isn't square.  How can that be??  I squared it just before I added the binding, and carefully stitched the binding on with a quarter inch seam.  I think I'll have to fool with it a bit more.  Darn!

Tuesday, August 12, 2014

I've been doing some planning and sample-making for a quilt workshop at the Bethlehem (PA) Area Public Library on November 1.  The program coordinator asked for a gift-making workshop for adults.  She has a few others for other Saturdays in November, including jewelry making.  I needed something that could be made completely by hand in two hours and given as a gift.  I may have participants who've never sewed before.  I decided on a mat for a candle or mug.  Here are my two samples.

The first uses Christmasy fabrics.  It is quilted simply with a button sewn in the center.  This serves two purposes: 1) To make a quick finish for those who have had enough and want to take home a finished product; and 2) To have a quick fix for covering wonky matches at the center point.  The second can be used year-round and includes hand quilting.  If anyone is having fun with the stitching and wants to do some decorative stitching at home.  I'll give a mini-lesson on hand quilting and send them home with a needle and thread.

I chose the half-square triangles because they allow for some design work.  I'll precut dozens of triangles, and each participant can use anywhere from two to eight fabrics.  I've made these cardboard pieces to show the different ways that the four squares can be placed.

How this goes will very much depend on who signs up.  We will take up to fifteen participants.  The program coordinator is a lapsed quilter and will stay to help.  I've also lined up two young women who are new to quilting to help with knots, both making them and untangling them, as well as answering questions and helping participants to use the rotary cutter to make the backing squares.

I'll take some photos of the event and post them here in November.  It's my first time teaching quilting to adults.  I've done a bit with kids, who are either very precise or wildly wonky and either stick with it or wander off.  Adults may be more easily frustrated or unhappy with their work.  I'll let you know.


Friday, August 1, 2014

Last weekend I went to Quilt Odyssey in Hershey, PA.  I couldn't believe the number of hand-quilted pieces in the show!  It's a small show, very juried, so each quilt is quite wonderful.  I spent an afternoon looking at the quilts and then went back for a few hours two days later to see them all again.

This mini (12"x12") won a blue ribbon.  Even standing in front of it, I couldn't get my head around the size of the work.  I left a little piece of the sign in the picture to give some size perspective.
My favorite quilt there was this gorgeous flower medallion - all hand appliqued and hand quilted.  There was some dimensional work on it, and I especially loved the lily of the valley.  I know that I will use this technique someday.


I took two classes: one called Happy Villages with Karen Eckmeier.  It was very freeing.  She is a clear teacher who also allows tremendous freedom.  Here are all of the things that I NEVER do that I'm doing in this quilt - not planning ahead, gluing, adding whimsical touches, using tulle, having raw edges.  Fun!  You can see that it is just halfway finished, but it will have to sit on the pile for a while, since I have work to do for the show in October.
The other class was in longarm quilting.  It was way over my head.  There were few students, and they were all quite experienced.  For a while, I tried to fake it, but then I decided to see what I could learn on my actual level.  It was a class on filling small spaces, and the two simple techniques I improved were echoing and making the same design to the right and left.  It turned out to be very useful.

Can you believe that I agreed to teach a little workshop at a local library in November?  It will be a two-hour Saturday program as part of their Homemade Holiday Gifts series.  I'm working on some samples that can be made by beginners, by hand, in two hours.  Don't know if this is possible.  I'll post my samples next time.

Tuesday, July 22, 2014

My quilt studio has become a bag factory.  I've been churning them out.  I now have fourteen completed for my guild's boutique and for gifts.  I can't say that it was boring, since each was made with different fabric, or at least different linings.  I'm quite pleased with them all.  They're about ten inches tall, a useful size.
I did like that I was able to use a lot of fabrics that I've bought because they had wonderfully bold patterns and then wondered how on earth I would use a fat quarter of the fabric in a quilt.  

On the other hand, making these bags has kept me from the work of making quilts.  AND now I'm heading for Quilt Odyssey at Hershey, where I have signed up for yet another class to make a wall hanging that will be someone else's design, not my own.  

I took a very pleasant scrap quilt class at my guild a couple of weeks ago and didn't even make the first block.  I enjoyed the color theory information but recognized that I would not be making that particular quilt.  I don't want to stop learning, but I need to make my own quilts.  Sooner, rather than later.

Monday, July 14, 2014

I've been doing a lot of clean-up/catch-up work this week.  I finally got the binding on the Anita's Arrows quilt, now known as "Dewey's Quilt."  It's on the white sofa ready for Dewey to nap on when the cold weather comes.  In the summertime, he sleeps outside, often on the patio chairs or table.  I've never had a cat before that could sleep soundly outside.  He's a pretty self-confident guy.


I've also put labels on a couple of quilts.  I've been typing them in Pages (the Apple version of Word) and printing them out on fabric pressed to freezer paper sheets.  Some people make really lovely labels, and I'm not too happy with the look of these.  They have a technology-produced look that runs counter to the look of the quilts.  I'll have to post a few of my efforts so that I can look at them and think about what to do.

I've also been working on some little bags.  My guild asks everyone to donate at least three handmade items to sell in the boutique at our show.  I found the pattern and tutorial for these by the Gourmet Quilter.  I just love her!  She lives on a houseboat that makes tantalizing creaking sounds during her YouTube videos.  She is unassuming and absolutely clear in her instructions.  Her taste in fabric is totally different from mine, and sometimes I scratch my head at her choices, but I love her ideas and techniques.  Here's a link to the bag tutorial:  http://www.youtube.com/watch?v=OcKMLG75cb0 .


Saturday, July 5, 2014

I went to the quilt auction at the Kutztown Folk Fair today.  It is THE place to see traditional quilts, especially those made by the Mennonite community.  There are about 2400 quilts selected for sale in the quilt barn during the 10 days of the fair.  On the final Saturday, 24 of those quilts, those judged to be the best, are sold at auction.  Of the 24 this year, 21 were hand-quilted.

Here is a photo of the audience waiting for the auction to begin.
The quilts that sold at auction went for $1000 to $5000, with most in the lower range.  The bidders here love hand quilting and traditional designs.  Three of the quilts received no bids and were returned to the farm.  I can't begin to imagine how I would feel if that happened to me.

Here is a gorgeous cheddar, red, and green hand-quilted Whig Rose quilt. 
This beauty with the traditional Amish distlefinks was a favorite with the crowd and sold for about $3000.  Personally, I'm not fond of the stars in the corners.  I think that they detract from the lighter look of the hand applique.  (Just my opinion.)  In case you're not sure what a distlefink is, it's a dove-like bird that is always looking back over its shoulder toward Germany from Pennsylvania.

When the auctioneer described this quilt has having "yoyo flowers," he set up a howl in the audience, which gave him a quick and chaotic lesson on ruched flowers.  It was quite funny!
I've learned that it really pays to stand in the line for the ladies' room.  The woman in front of me was the successful bidder on the quilt with ruched flowers and shocked her husband by telling him that the dogs would no longer be permitted to sleep on the bed.  The woman behind me was a tiny Mennonite woman who explained to me how she hand-quilts away from her body on a frame.  (I have to use a hoop, because I can quilt only toward myself.)

It was a glorious day here in PA, and we even bought a beautiful hand-made rocking chair.  No quilts: those I have to make myself.


Thursday, July 3, 2014

I've been away, cruising on the Danube River.  What a beautiful trip!  It's funny how I see everything through a quiltmaker's eye now.  I kept snapping pictures of patterns for applique or quilting.  I'm not much of a photographer, but these are really just for reference.
This one was a plaster ceiling in the abbey at Melk, Austria.  Another one below.
The next one is the tile roof on the Matthias Cathedral in Budapest.
And here is a doorway in the Parliament building in Budapest.
And these two small bags were irresistible.  They are Hungarian and hand-beaded.  I can see them translated into applique.  They are stunning on black, but I'm not sure I want a black background.  I'm starting to imagine a medallion quilt with a pale yellow background and some of the flower designs in reds and pinks.  Not at all sure about that, though.
When I travel, I take along a project that will probably last me for years.  I make small Sawtooth Stars, cut from templates and pieced by hand from my scraps.  (I thought that these were called Evening Stars, but maybe not.  I think that they are also called Variable Stars.)  I try to make each one pretty within itself, but I don't try to make them match each other in any way.
Meet Dewey.  Look at that arrogant face!  "You want to take a photo of a star?  Well, here I am."


Wednesday, June 18, 2014


I've finished the quilting on Anita's Arrows and taken it off the frame.  I'm pretty happy with the quilting.  Some of it is free motion.  I'm able to do the vine/leaf/curlique quite easily.  For the ditch work I use a Line Tamer ruler, and for the even curves in the petals in the four-patch blocks I use a semi-circular ruler.  I've gotten much better about not wandering off the rulers.


Now I'm worrying about the binding.  You can see from this photo that the quilt is not square.  I had to choose between keeping the points on the border squares and making the quilt square.  Since I'm addicted to points, I went with the uneven edge.


However, to get 1/4 inch for the seam at each point, I have a tiny margin for the seam between the points.  The quilting pulled the top in between the points, so I will have (I hope) 1/8 inch of the top with 1/4 inch of batting and backing in the seam.  I've got the binding cut, but I'm expecting real trouble sewing it on.


Friday, June 13, 2014

Distractions!  Distractions!  Besides too many non-quilting irons in the fire, I keep adding quilting projects, so my Christmas house is languishing.

My guild had a workshop last Sunday with Linda M. Poole.  Yet again, the topic was WAY outside my comfort zone, so, of course, I signed up.  What fun!  It was like playing with a really cool coloring book for a day.  We started with line drawings of a sweet bird.  We used ink pencils, InkFusion textile medium, and brushes to create a water-colored look.  Then we used a simple fabric marker, the kind I remember using to write my daughter's name on all of her camp clothes, to outline the colors.

Here is my finished painted bird.
And here are the tools from the kit.
I'm thinking of using this as another mini for my guild's mini-raffle at our show in October.  I might try quilting swirls in the sky background or maybe take my first shot at McTavishing.  For the bird, I'm thinking of following the black lines with black stitching.  But first, I have to free up Big Mama, my longarm machine.

I haven't yet mentioned that I am working on a UFO on my longarm, too.  You may recognize some of the fabrics as scraps left from the quilt I use as the banner for this blog.  I just loved these colors and patterns, so I decided to do a quilt from a Craftsy class with Anita Grossman Solomon.  The design is called "Anita's Arrows."  I'll show you the whole thing when it's done.

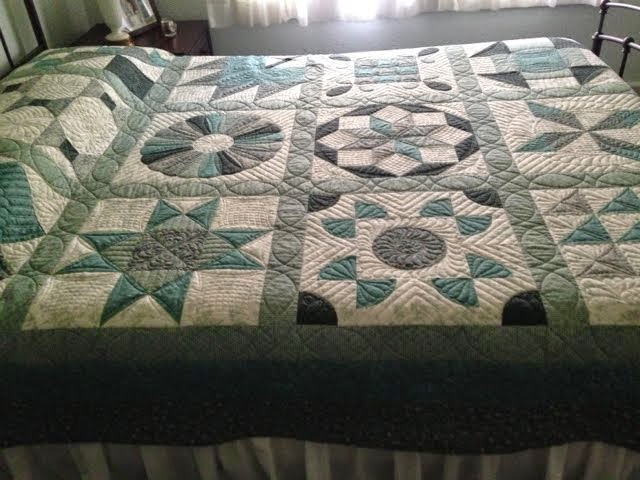
I have a white sofa.  Don't ask me why I bought it when my daughter was a baby and we had two kittens.  Oh, maybe it's because I was completely crazed at the time and doing irrational things.  Anyway, our indoor/outdoor cat, Dewey, likes to sleep on it and eat mice and moles on it, so it's always covered with an old blanket, thus destroying the beauty of the living room.  I've been using this quilt to practice my longarm quilting, and it will officially be "Dewey's Quilt" and cover the white sofa.  (What the heck.  I'll wash it, right?)


Even from a distance, you can see that the quilting is nothing to write home about.

With any luck, my next blog entry will be about a finish - of something, anything.


Thursday, May 29, 2014

I went on a quilt retreat with my guild.  It was so much fun!  There were thirteen of us in a lovely setting, with a cook who happily made me gluten-free meals, a massage therapist one day, and lots of sewing going on.

I started on my Christmas house quilt.  It was scary, because I had a picture, but I didn't know how to make it happen.  I got such good advice, especially from a woman who is working on a glorious crazy quilt.  I knew that I couldn't make that little cat out of fabric, or at least not in the way I usually applique, by hand with turned under edges.  The suggestion to embroider the cat with a satin stitch was perfect.  I admit here to using a very fine black marker to improve the outline of the cat.

Since the embroidery went so well, I got more advice about doing the wreath.  I used a feather stitch in two shades of green for the pine and little red berries of French knots.  I'm very happy with the results.  I did just a straight, black, machine stitch to define the windowpanes.  The next step is to hand applique the door and windows to the body of the house.

I also had a chance to finish the top of a T-shirt quilt that I've been putting off for a year or so.  It's for my public library.  The T-shirts were the prizes for six years of the children's summer reading program.  The thin sashing and borders are from a confetti print I bought at Hobby Lobby.  I'm hoping that the fabric stands up.  It feels fine, maybe a little stretchy.

I'm not sure yet how I will quilt it.  I'm thinking about a bubble-style meander in colors matching the t-shirts on the shirts themselves and something simple in black on the black sashing and the confetti-print sashing.

Once I give it to the library, it will be up to them what they do with it.  They may decide to display it in the storytime room, give it as a prize, or raffle it off. 

Thursday, May 15, 2014

We took a weekend trip to Boston for my daughter's birthday, and I had a chance to spend a day at the quilt exhibit at the Boston Museum of Fine Arts.  The quilts were all from the Roy/Pilgrim collection.  The theme of the exhibit was color theory, especially how backgrounds need not be white.  One room of the exhibit featured unusual quilts, and this one was certainly unusual.


It is an Amish quilt that includes some printed fabrics, and I love its story.  The woman who made it worked in a dry goods store, and the owner would give her fabric from the ends of bolts.  When she had gathered a pile of printed fabric, she went to the bishop and told him that she would either have to waste the fabric or break the rule that only plain fabric could be used in a quilt.  He told her not to waste the fabric, to go ahead and use it.  However, when the quilt was completed, she was so verklempt about the broken rule that she could never make herself use it on a bed! 

While in Boston, I worked on a sketch for my own Christmas House quilt. 


I'm not sure how I'm going to make it.  I'm thinking of using raw edge machine applique for the snow and then machine piecing the house and hand appliquing that onto the background.  I may have to starch the dickens out of the house to do that, or I may decide to foundation piece the house onto a piece of muslin before I applique it on. 

I'm not naturally very whimsical, so I'm still not sure about the rabbit out near the tree.  Somehow the cat in the window seems right, though.  Actually, the whole tree thing may change.  Possibly the big tree on the left will move down and I'll add a small one to the right of the house.  I may use beads to put lights on the outdoor trees. 

Thanks for stopping by.  All suggestions are welcome.

Tuesday, May 6, 2014

What to work on next???  Since I am the only member of my immediate family not to have or be working toward an actual PhD, I am glad to say that I have many quilting PHDs (Practically Hardly Done, for newbies).

With our guild show coming up in October, I need to make a mini-quilt for a raffle.  It can be anywhere from 6 by 6 inches to 24 by 24 inches.  I have it in my head that I should make a Christmas house scene.  I think that will be a popular theme in October.

I've been gathering fabrics.  I want it to be at night with a warm light shining out through the windows.  I've been thinking about this for weeks, and I think I'm going to have to combine foundation piecing with applique and a bit of hand embroidery. 


I found this dark, snowy sky piece several months ago.
I didn't think that I could use the dark sky for my foundation with the white snow on top of it, but I think the dark underneath really makes the snowflakes appear on the white.
Here is a very rough layout.  I'm thinking red door, yellow windows, green plaid drapes in the windows.  Hmmm, I'll have to be sure that the bricks are horizontal.  Vertical bricks won't make a very strong house, eh?
Time to get out the graph paper and draft it.  Any and all suggestions are most welcome.


Wednesday, April 30, 2014

The finished quilt actually came out the way I imagined it when I drafted it on graph paper.  That's a first!

AND, I won my first ribbon ever!  And it's blue!  Some of the other quilts were amazing, and I was surprised to win.  I think that the guild was surprised, too, since I'm pretty new there.  I wish I could post photos of the other quilts, but I can't do that without permission.

A friend - yes, she is a true friend - told me that some of the other quilts were more beautiful but than mine used the fabric in a unique way, which is probably why I won.  See, I said that she was true...and also truthful.

Sunday, April 20, 2014

The finished top looked like this:


Then I had to figure out how to quilt it.  I am so fortunate to have a used longarm: a Handiquilter 16.  I'm pretty inexperienced with it, so I knew that there would be many opportunities to destroy the quilt.  I loaded some old pillowcases onto the frame and tried out lots of patterns.  I was able to do a decent woodgrain pattern, so I used that on the gray shelf pieces.


I took a longarm quilting class with Dawn Cavanaugh at the AQS show in Lancaster in March and asked her advice on how to quilt the white background.  I was so afraid that I would draw the eye away from the pots or that I would make a mistake that stood out.  She suggested trying to make the white look like whitewashed adobe with up-and-down lines that curved into each other and left some empty spaces.  I was able to do it, and I like the way it turned out.